The 100 Day Project days 16-20. With today’s post this project is 1/5 of the way done. It’s been refreshing to look at positivity during the day. It’s making the practice easier.
Day 16 – April 18th, 2018
Maybe you have seen this. Maybe you have not. I found this video awesome. She learned a Beyonce dance in days. That is kick ass. I don’t know this girl, but I want to be her friend.
If you thought I was about to sit here, learn choreo & dance like I’m one of Beyoncé’s backup dancer… YOU’RE ABSOLUTELY RIGHT!😂👌🏾🔥#BeyChellapic.twitter.com/157vovRFjG
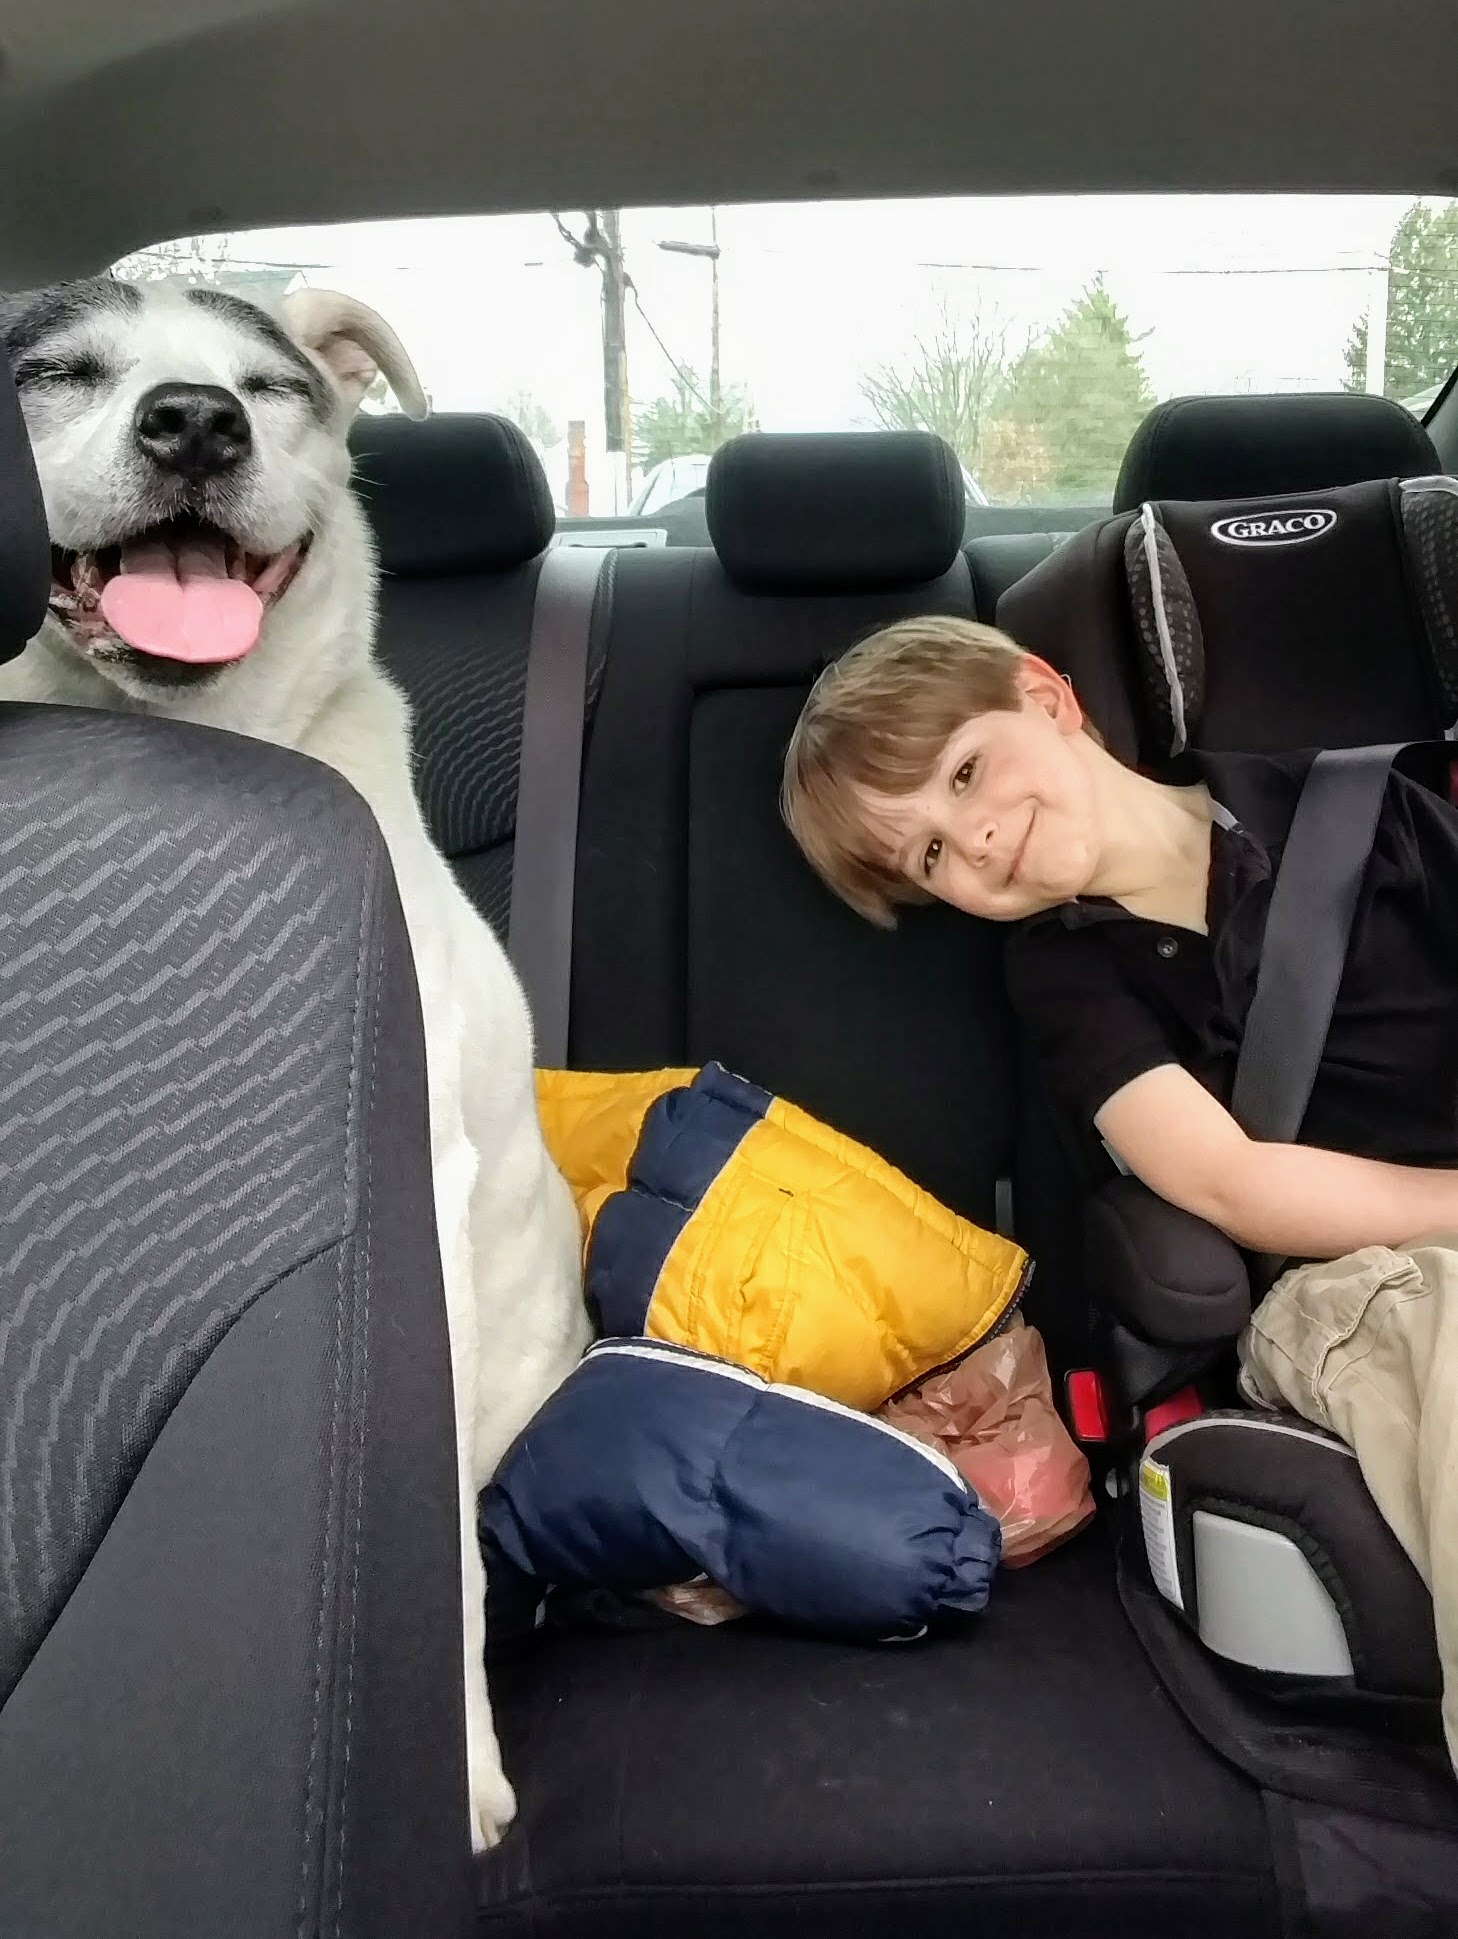
Two of my boys enjoying a sunny afternoon. Boss got a car ride, note the smiling face. P is now tall enough to put his hand out the window. He loves it. That late afternoon sun feels so refreshing.
Day 18 – April 20th, 2018
Five miles run today. No pain + no stopping = fastest time in a while. Considering I have a half marathon in a couple of weeks, this is a good thing.
Day 19 – April 21st, 2018
Family time. We played outside and worked in the yard. It’s finally spring and that feels amazing.
Day 20 – April 22nd, 2018
SPRING! My favorite tree is in bloom. The magnolia tree is vibrant and every year I’m in awe of their blooms. I ran 8.6 miles and saw a number of them along my route.
Earlier this week I talked about how this project got started. So let’s dig into how the final product came to be.
Layout
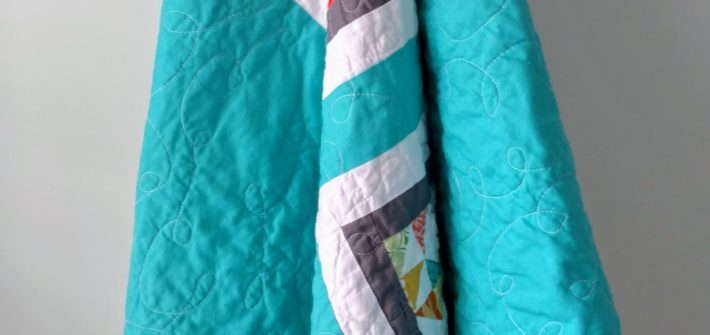
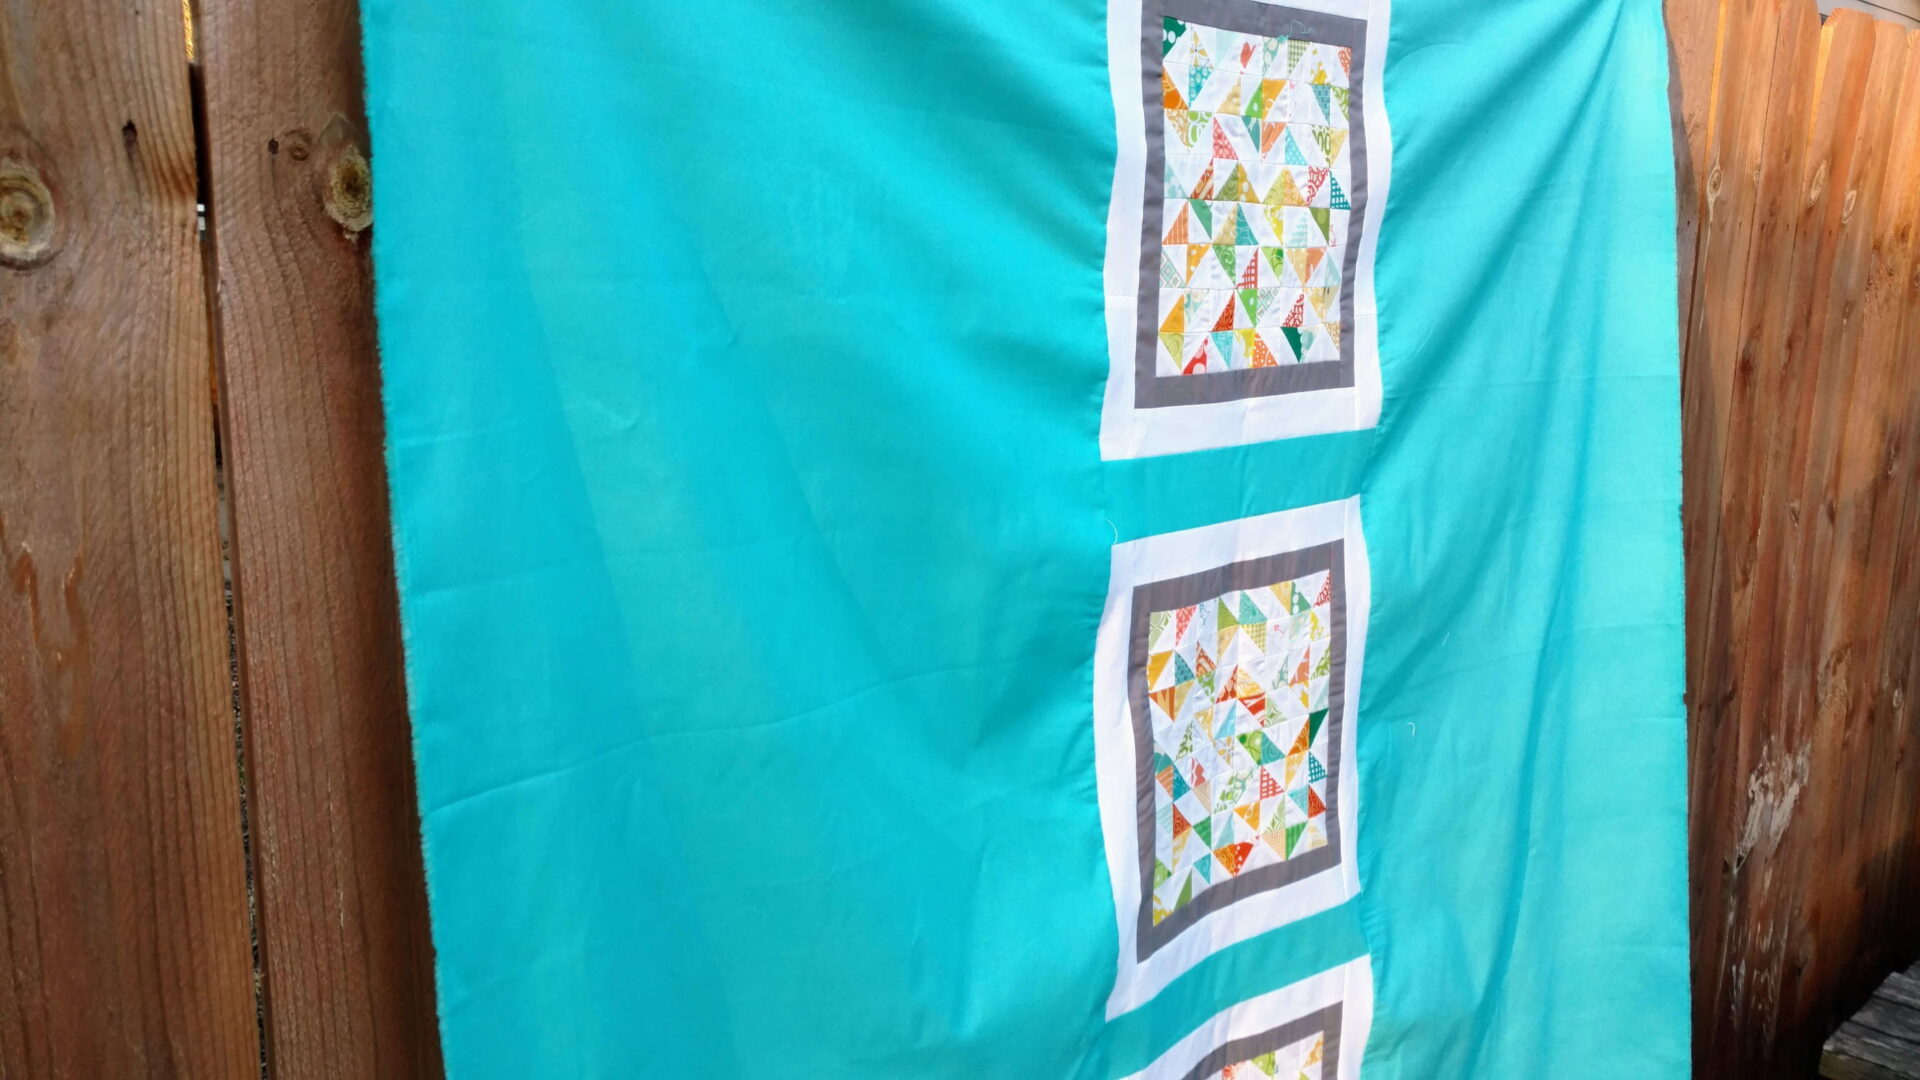
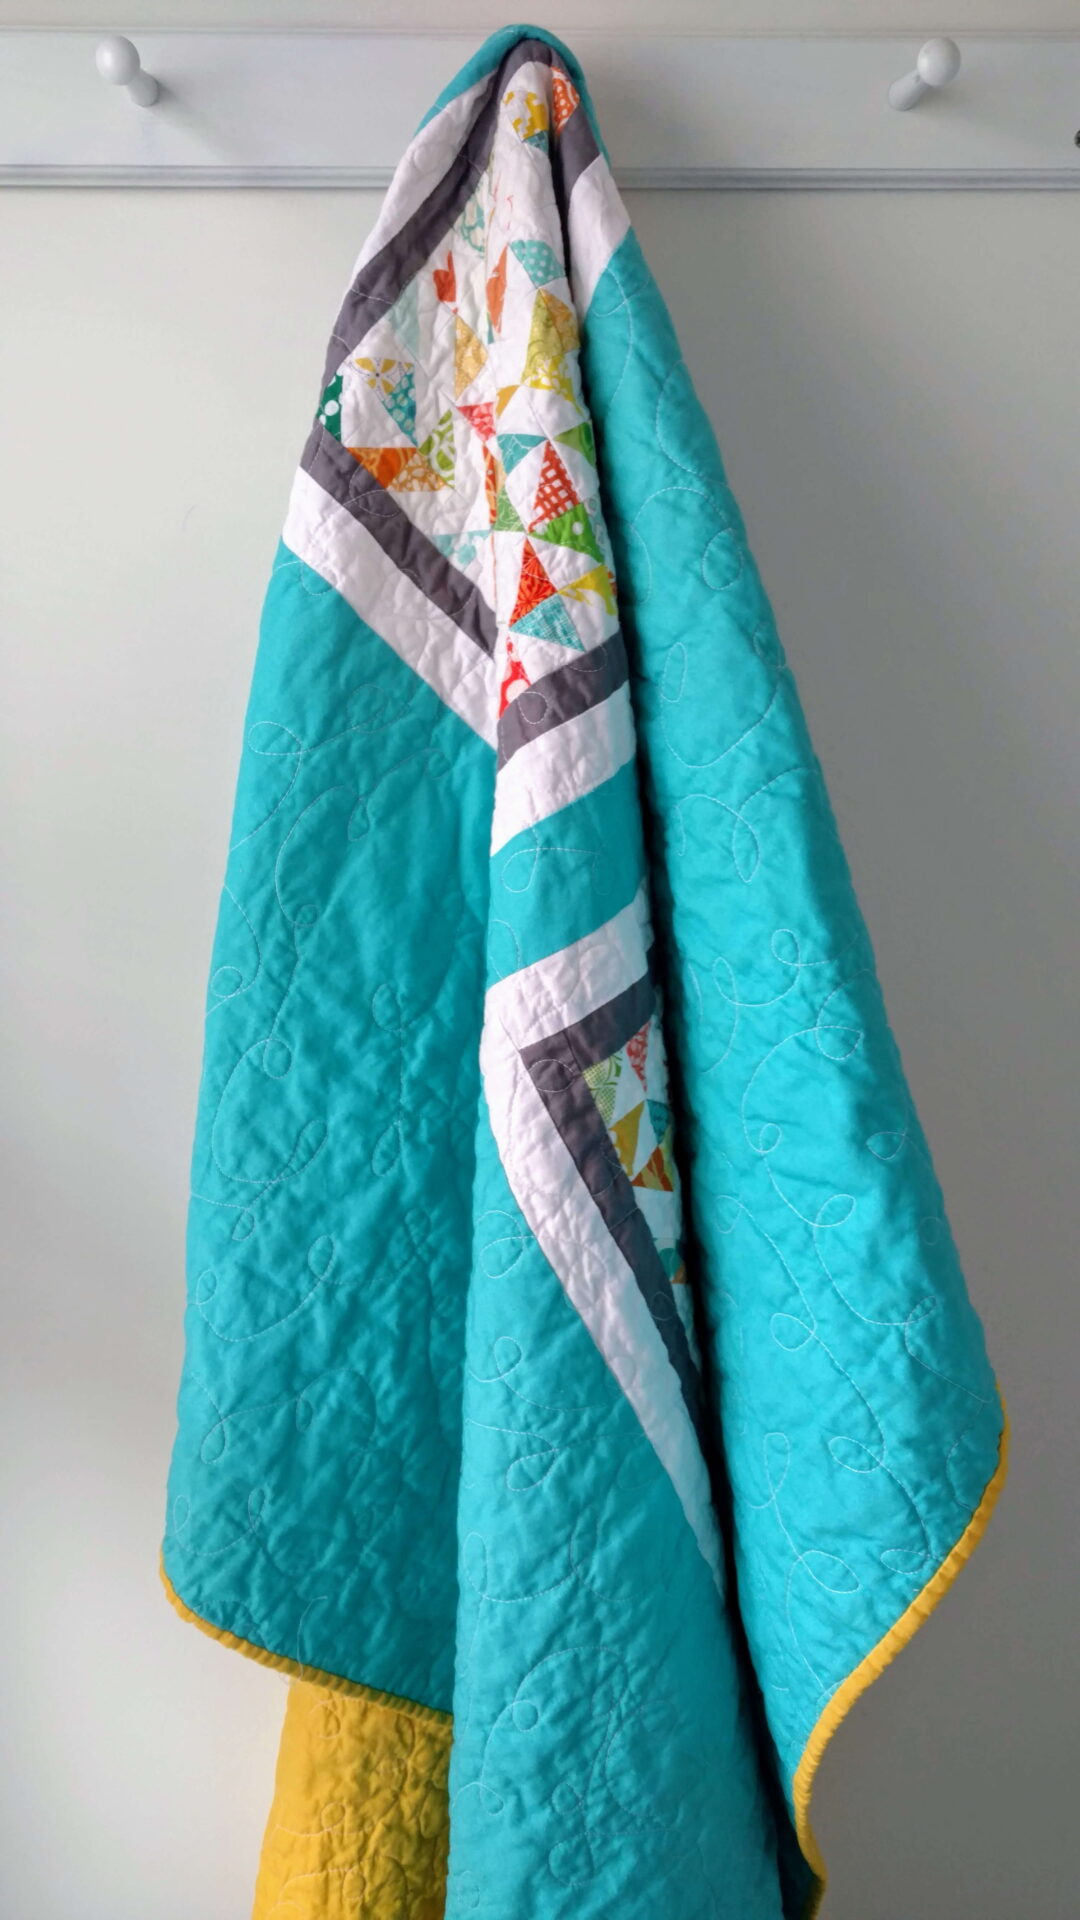
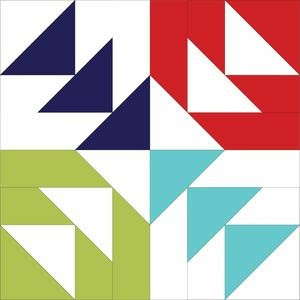
In my retreat bag I stuffed a number of projects and a few Kona solids. You can’t go wrong with white and shades of gray. I had some gray scraps that I wanted to use up. Once the blocks were made I knew it needed a bit of a border. This quilt was a bit of the inspiration.
This is what I ended up with once I added some gray and white borders to the blocks. Then I used that lovely Kona Capri to surround the blocks. I know, it’s a little out of my comfort zone for a background.
I pieced the backing and binding as well at the retreat. Quilting wasn’t really on my agenda for that weekend. So, I wrapped it up on an empty bolt I had. Genius idea to reuse those bolts. Easy to store my projects and I can have everything for the project together.
Quilting
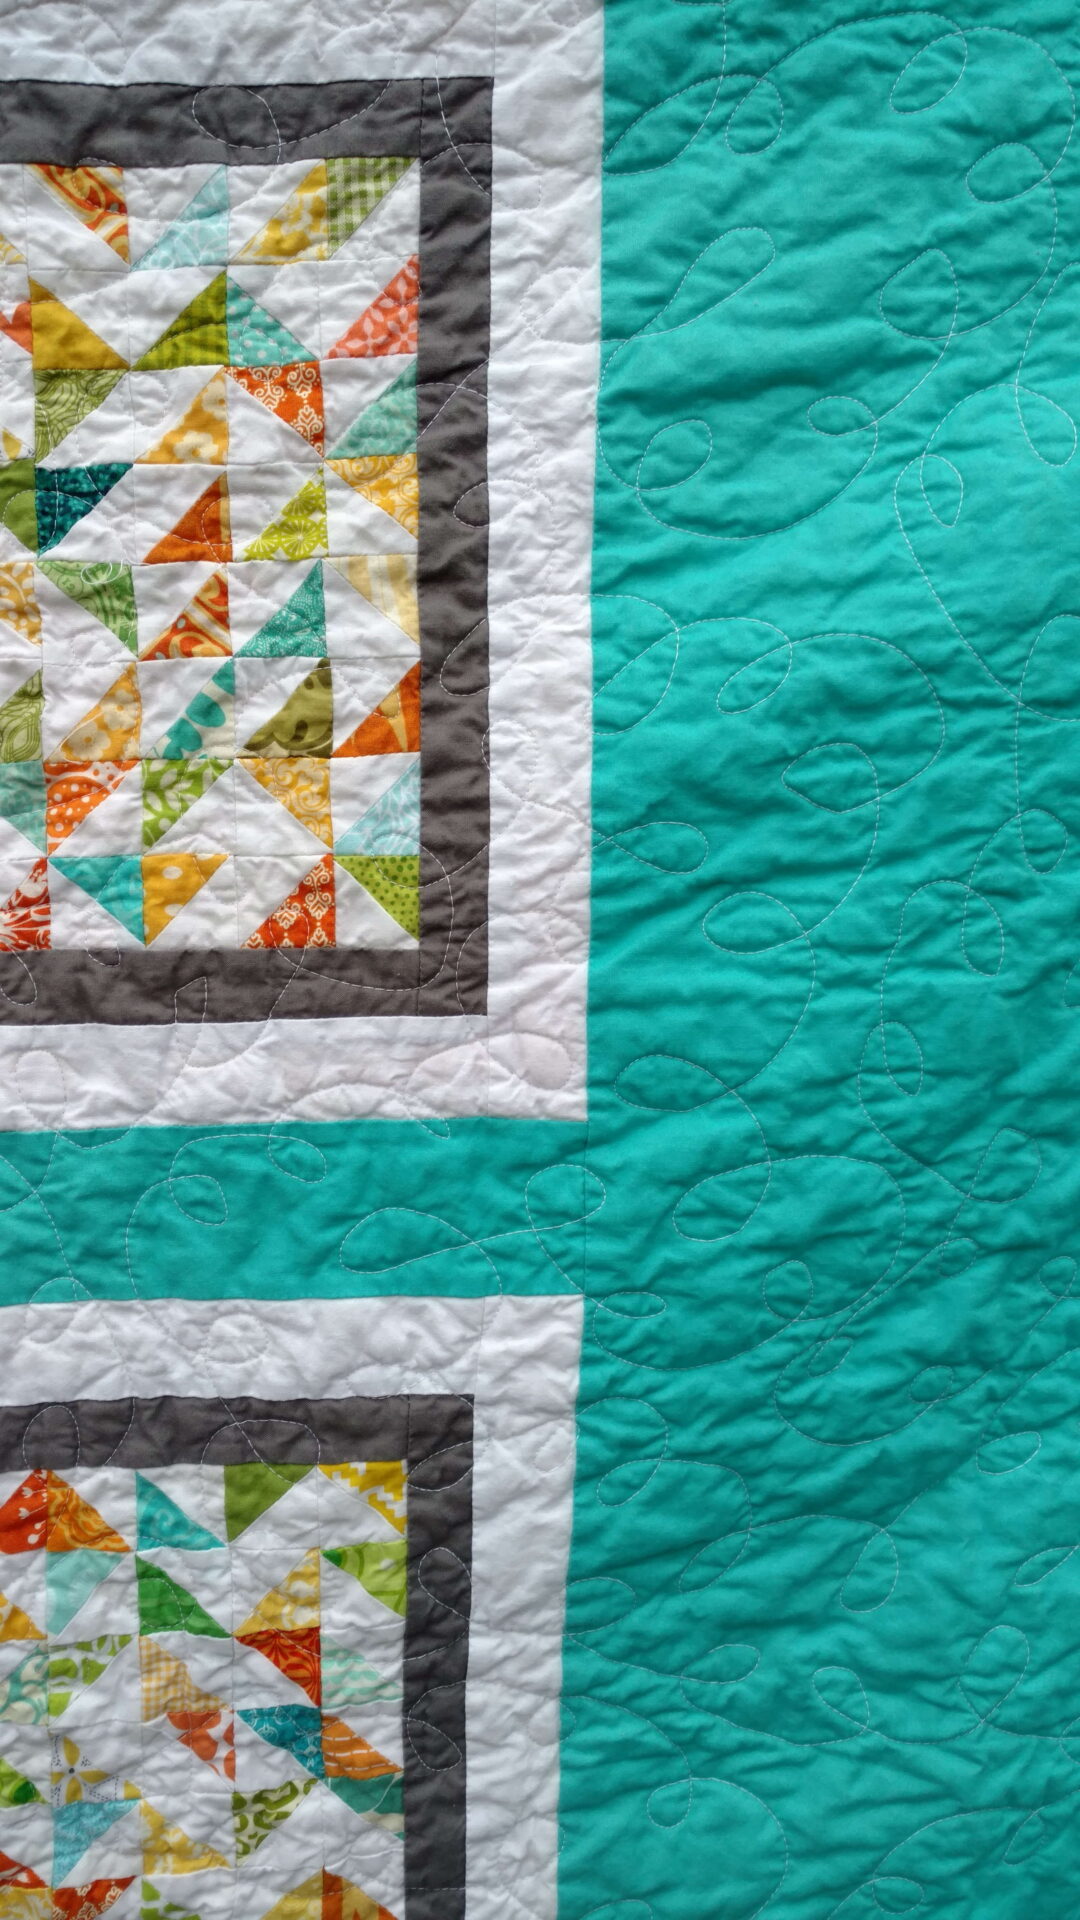
When it came time to quilt, I went with simple free motion loops. It was a nice contrast to the triangles and squares.
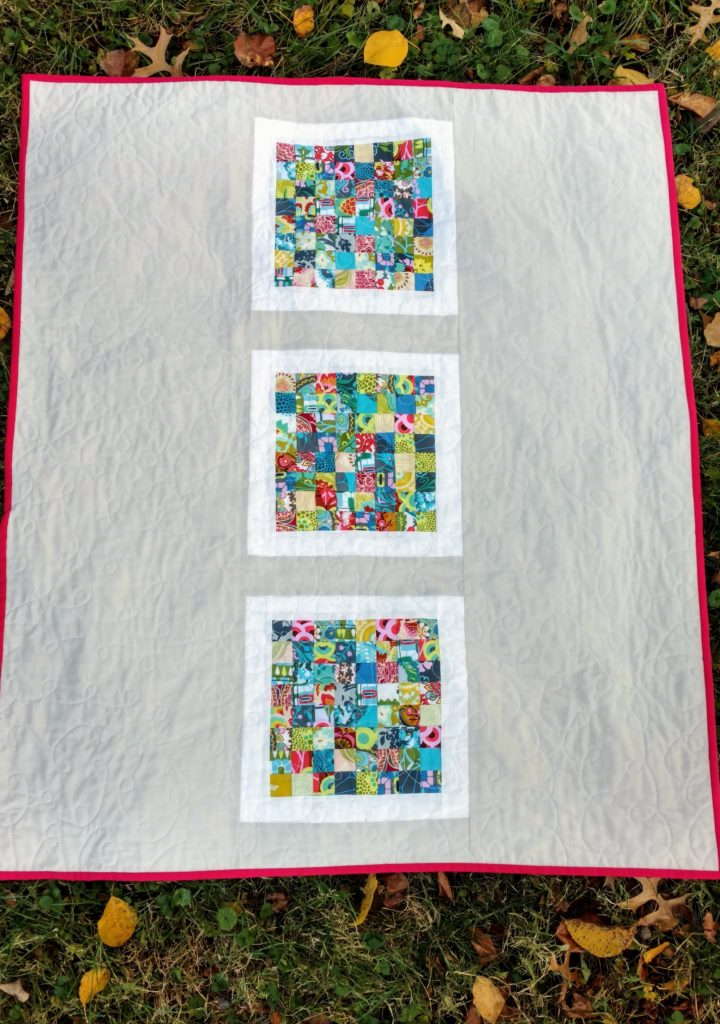
I love the colors on the back of this quilt. However, the fabric did not want to cooperate when it came time to baste. Look at how crooked that is? UGH. We will call this a design element.
The quilt is straight, but with that crooked backing it looks lopsided.
Overall it’s bright and fun. It’s out of my comfort zone but it’s a finished quilt. This is more of a throw sized quilt so I’m not really counting it in my baby quilt goal. It measures 53″ x 54″. Thoughts?
The quilt is currently for sale in my Etsy shop. You can find some other great quilts looking for new homes over there as well.
So glad I cleaned out the sewing room and found these just sitting there. It was a great project to just play with and create. The entire project is scraps and stash fabrics. Win win.
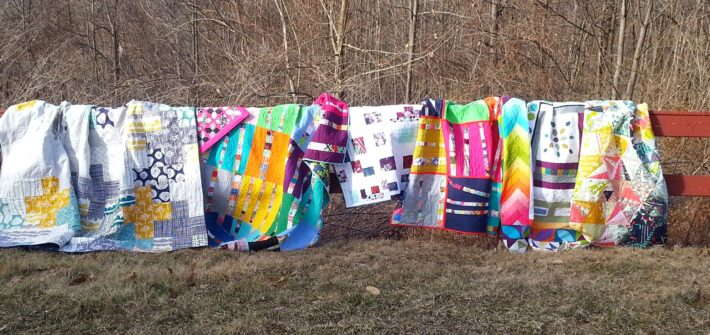
Does your quilt guild offer a retreat? If you haven’t been because you’re nervous let me highlight why you should be going to a retreat. Indy Modern Quilt Guild has been hosting a retreat for five years and we have had newer members join us each time. Were they nervous at first? Absolutely.
1. These are your people
Quilters get each other. We understand your obsession with a designer or getting sucked into a quilt-a-long. This is a place where you are among people that understand that need to create. You all may have different styles, but that’s part of the fun. You also get support, see #3.
2. You have time to create
Time away from home, your commitments, and potentially Wifi give you that time to tackle your sewing list. Maybe you want to make 4 quilt tops, maybe you want to quilt a massive quilt you haven’t had time to do, or maybe you want to tackle a pattern that you may want help with.
3. You have support
You have built in help over the weekend. Not sure about a design choice? You can get instant feedback and make a change. We like to call it quilt by committee at our retreat.
4. You can try new tools
Is there a ruler you’ve been wanting to try? A machine you’ve been eyeing? Good chance that someone on the retreat may have it and let you try it out. At our recent retreat someone was struggling to sew a bag on her machine, so another member offered to let her try her machine. It’s the machine she’s been contemplating buying. Now she’s saving up for that machine. Hello free test drive on something you will make.
Someone brought their Accuquilt cutter. I had not played on one and tried to use it. Ugh, not my jam right now. However, someone else used it to cut into a fat quarter bundle she wanted to play with.
5. Girl time and time with friends.
I don’t think many of us get enough girl time in our lives. A retreat is a wonderful opportunity to truly connect with someone else. Learn about their lives, hear their story, and start supporting them. Some of my close friendships were bonded at the retreat years ago.
Bonus if someone brings things to help you relax. Facial masks, a massager, and/or wine helps.
The next time your guild hosts a retreat, go! Don’t hesitate because this is an opportunity you don’t want to miss out on.
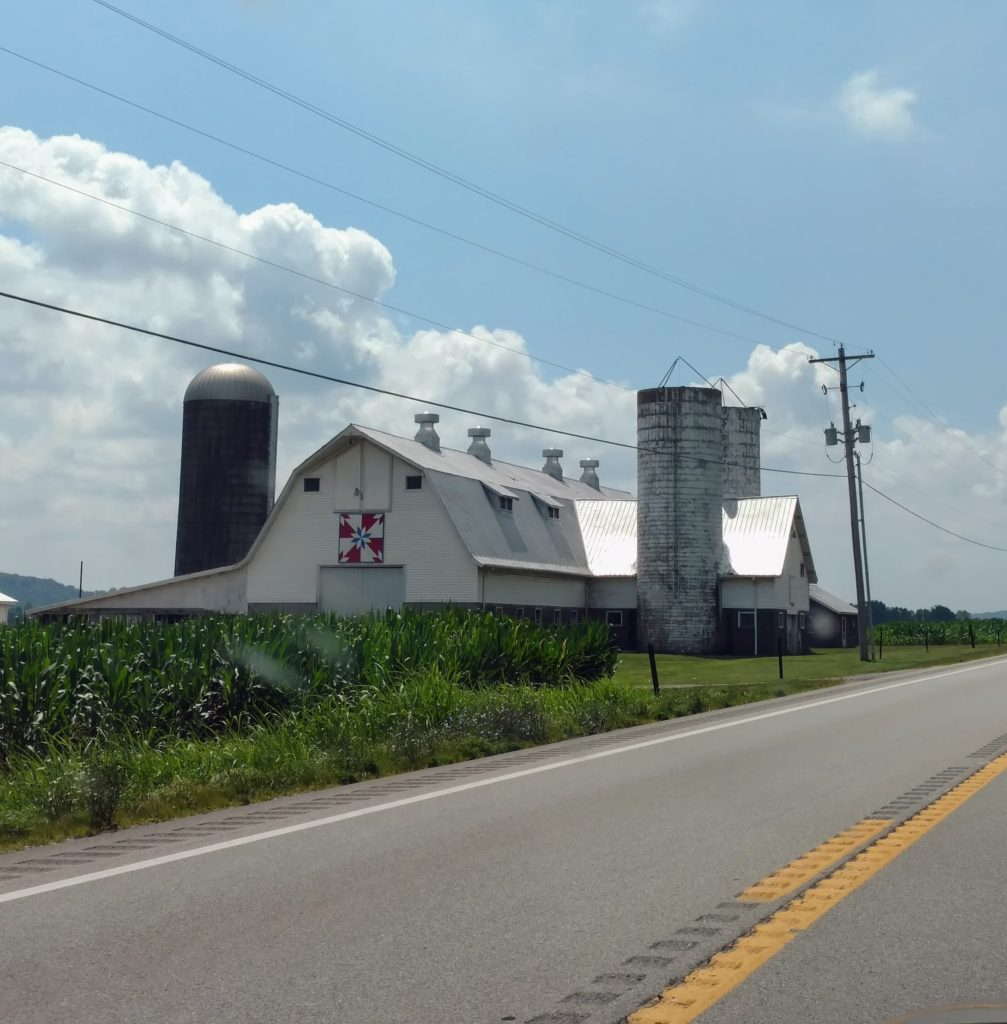
What the heck is a barn quilt? Well, it’s a piece of art on a barn. Honestly, it’s a quilt design hand-painted onto a piece of wood. The maker then suckers someone into getting on a tall ladder to put up the lovely piece of work. Afterward, everyone that drives by can see the artwork from the road. See the bottom of the post for more information.
Somewhere in West Virginia
If you’re riding in a car with me and I see a barn quilt I yell, “BARN QUILT!” Everyone flinches and wonders what the heck I’m yelling about and pointing to frantically. It’s a fun game in the car for me.
Over the summer I decided my garage needed some artwork. P and I went to JoAnn’s to grab the supplies. He got to pick out the colors. Surprisingly, he did not pick orange or neon green. The kid loves orange. You can use scrap wood or purchase the pre-cut versions at JoAnn’s. Lowe’s has pre-cut squares available as well.
My version
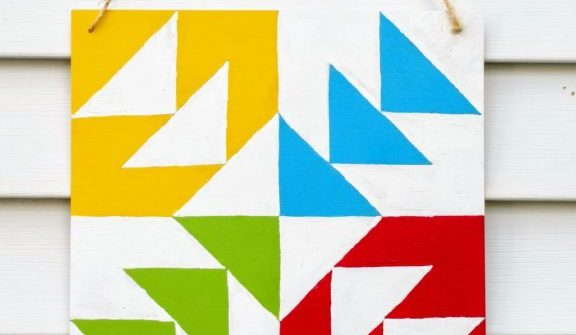
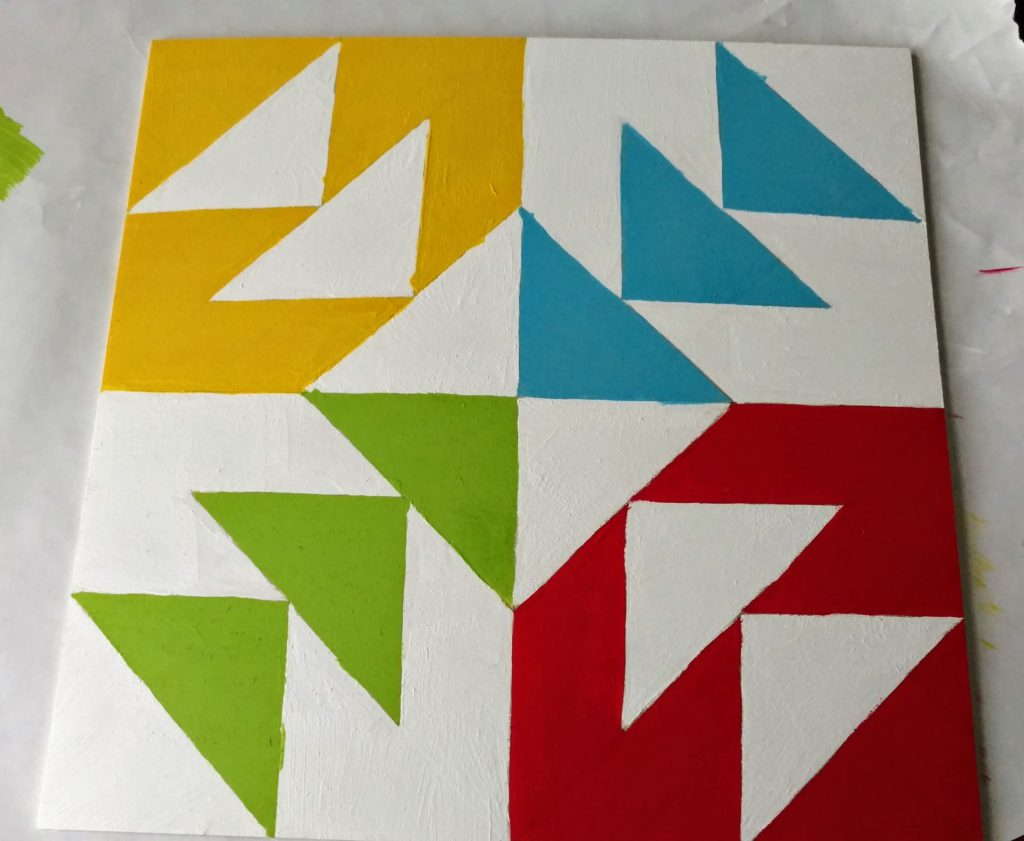
My inspiration comes from this block on Pinterest.
I marked up my wood square as best I could.
Don’t look too close
I started painting within the lines the best I could. It took a number of coats to cover up the pencil lines and get everything to look correct.
I swear I can paint within the lines. Ha! There were lots of touch ups throughout the painting process.
P’s version
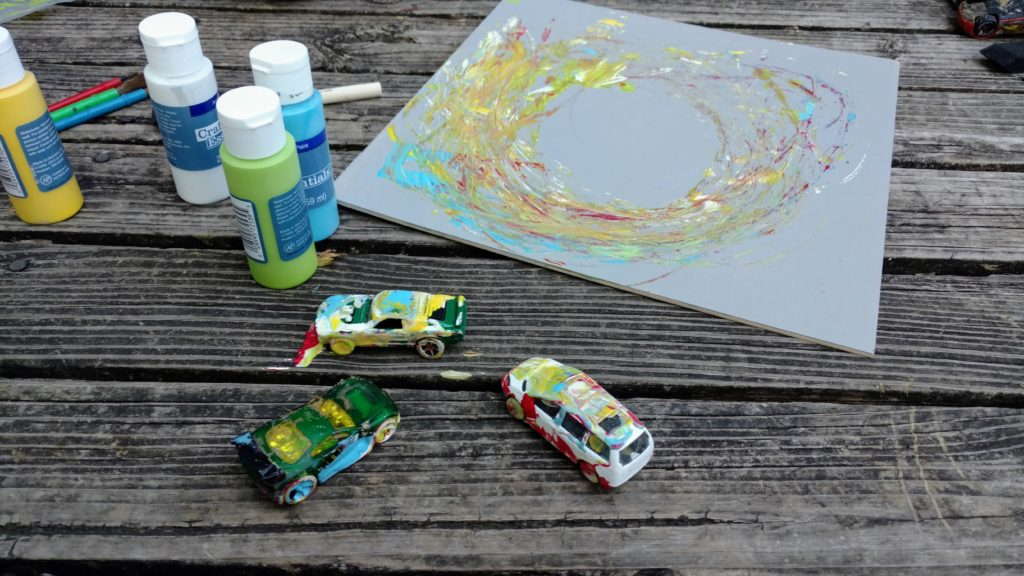
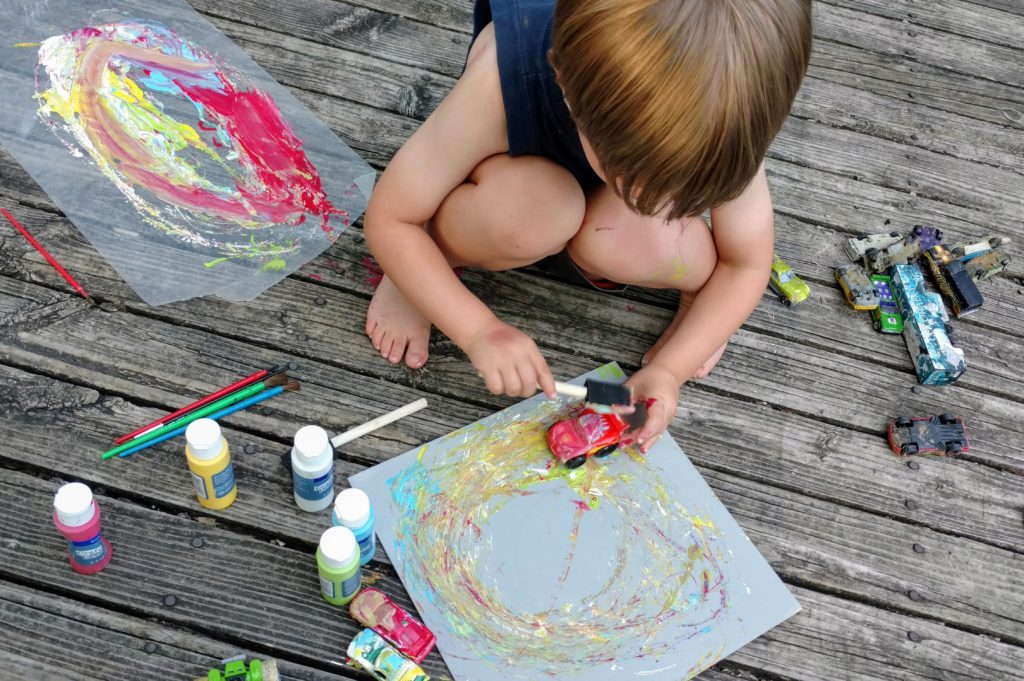
I wanted P to make a version as well. His square was painted with gray as a background since he loves to paint with racecars and monster trucks. Who needs paintbrushes when you have cars? We went outside for P to paint. I squirted paint onto wax paper and P ran his car or truck through the colors he wanted. Once the wheels were nice and coated, he moved over to his square. He created a race track with his painting style.
The cars and P got a good bath after painting. Once the paintings dried I sprayed them a number of times, front and back, with a clear matte top coat. To create a way to hang these, holes were drilled in the top corners and twine ran through the holes. For this next part, splurge on the outdoor Command hooks. Not just the regular ones, they don’t hold up as well. Minutes after taking these photos, my barn quilt had fallen into the garden.
I love having these outside and that P created something with me.
Have you made a barn quilt? You can find inspiration and tutorials on Pinterest to help you create your own.
Need an easy baby quilt? Dig into your scraps and let’s get started.
If you have been a reader for a while, you may know that I keep my scraps in tubs until it’s time to sort them. Well, my solids are kept separate and they were getting out of hand. The drawer could no longer even be stuffed close. It was time to make something again.
Inspiration
Nothing was really speaking to me, so I headed to my Modern Quilting Inspiration Pinterest board for ideas.
An older quilt from Red Pepper Quilts caught my attention. Rita’s version can be found here. This is a step by step guide on how to create my version.
Design
Tip: Without different hues and saturation, the quilt could run together.
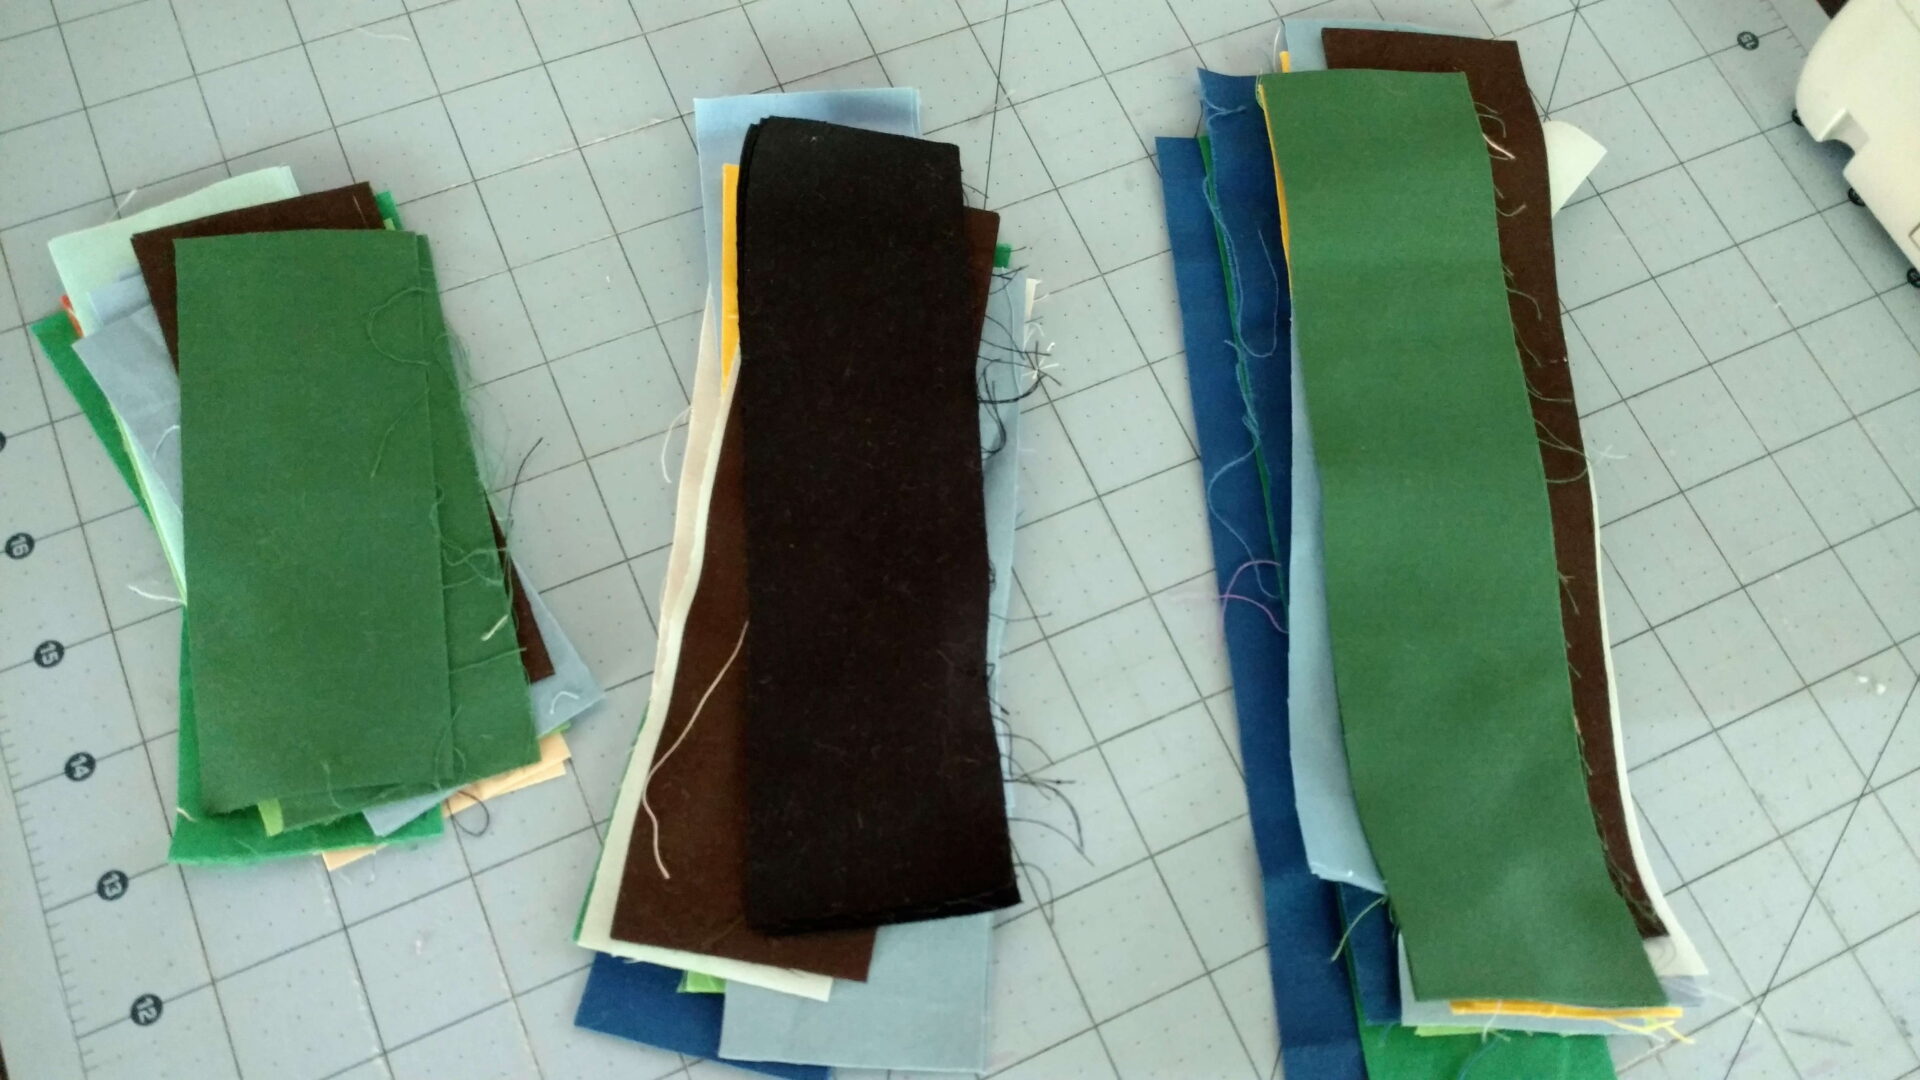
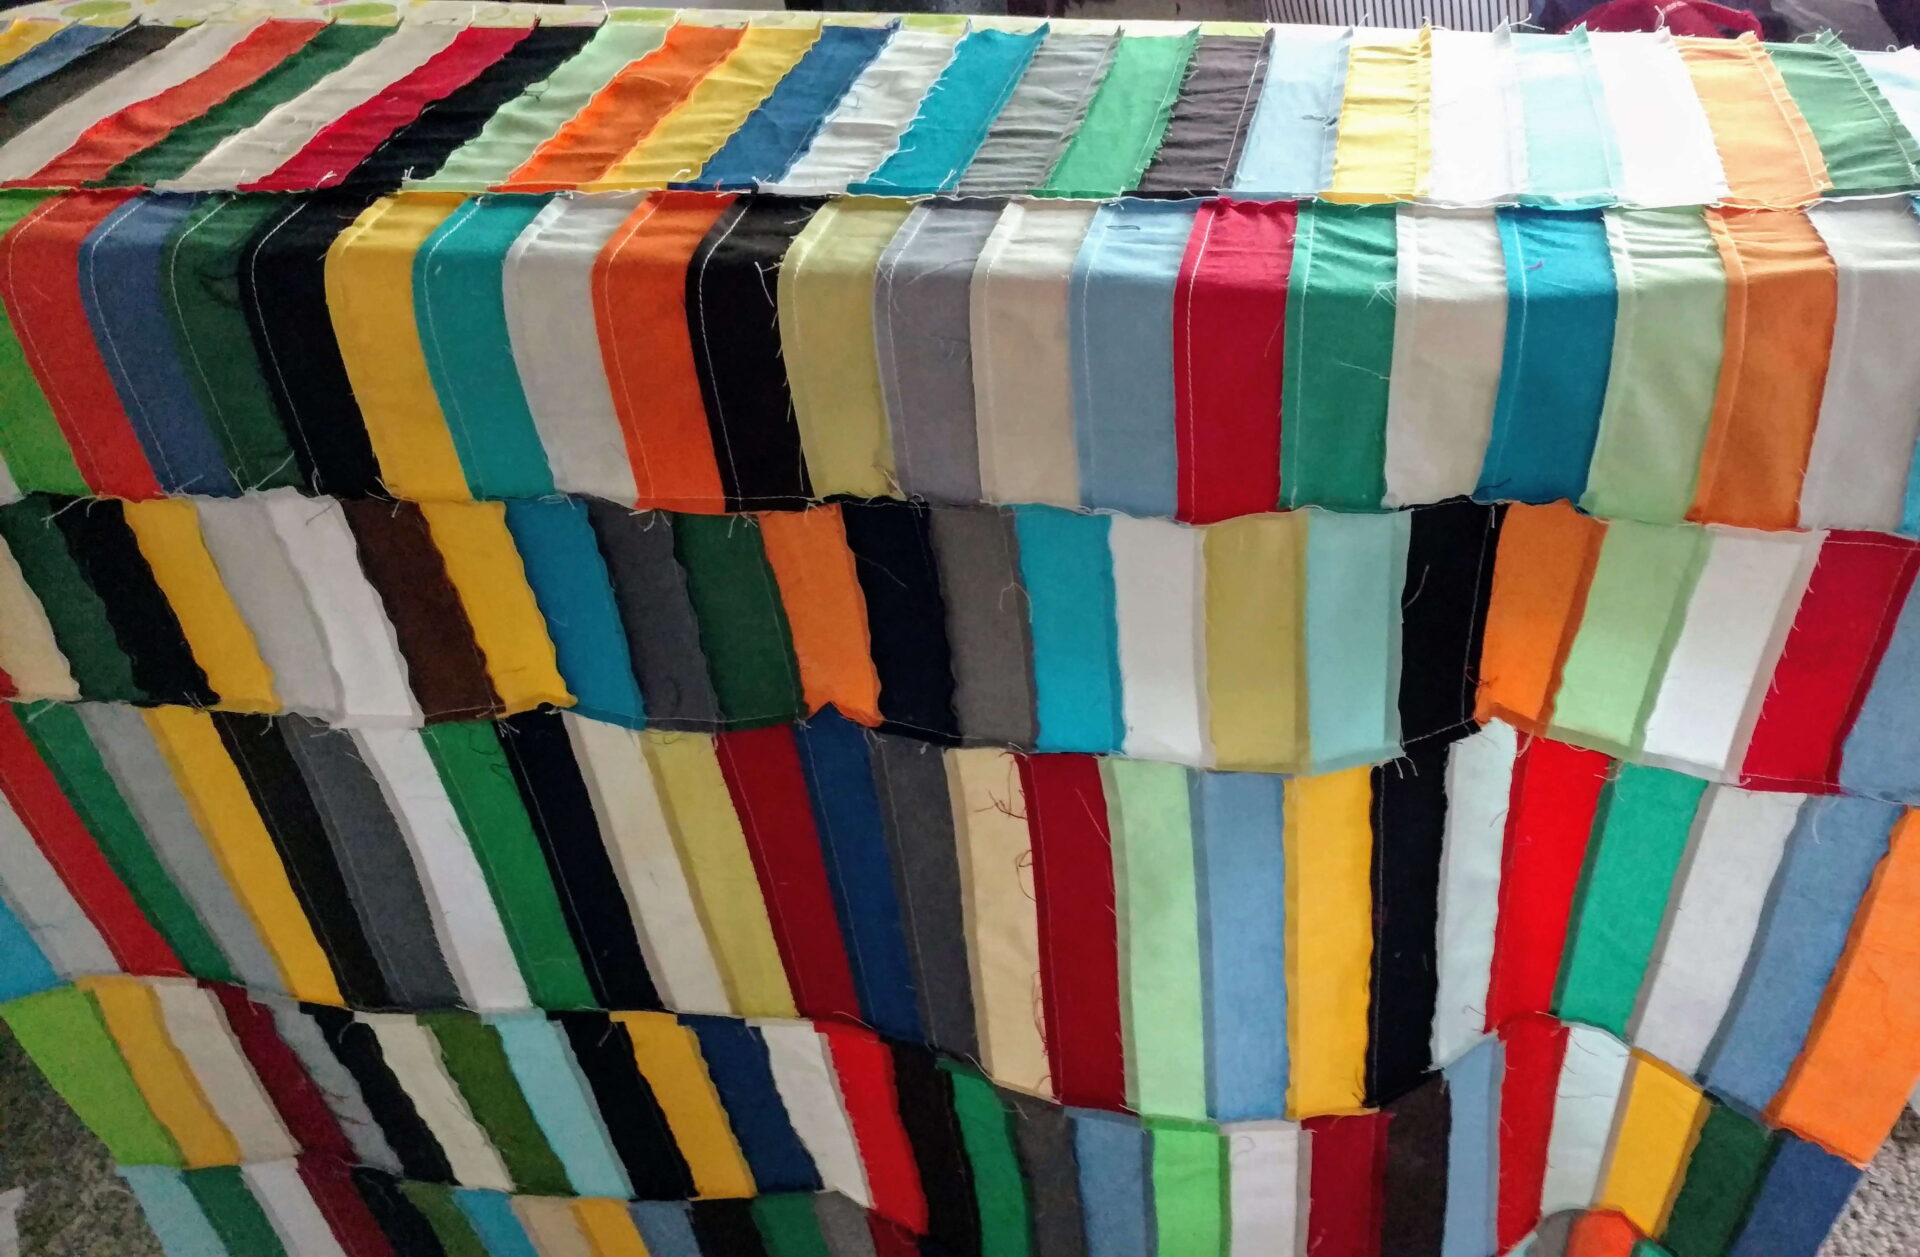
Off to the scrap bin I went to start gathering strips to make my version. I was able to collect many strips and have the variety of colors/saturations I desired. However, I didn’t have many long strips like the inspiration quilt.
Based on my scraps I could create strips in 2 inch width to get the most from my pull of fabrics. The lengths would be 5, 7, and 9 inches. Feel free to create based on what you have in your scraps.
Each size stack was sorted yet again by color. Orange, yellow, blue, green, brown, black, neutrals, and gray. Sorting will help when piecing. I wanted to avoid having too may of the same color right by each other.
Piecing
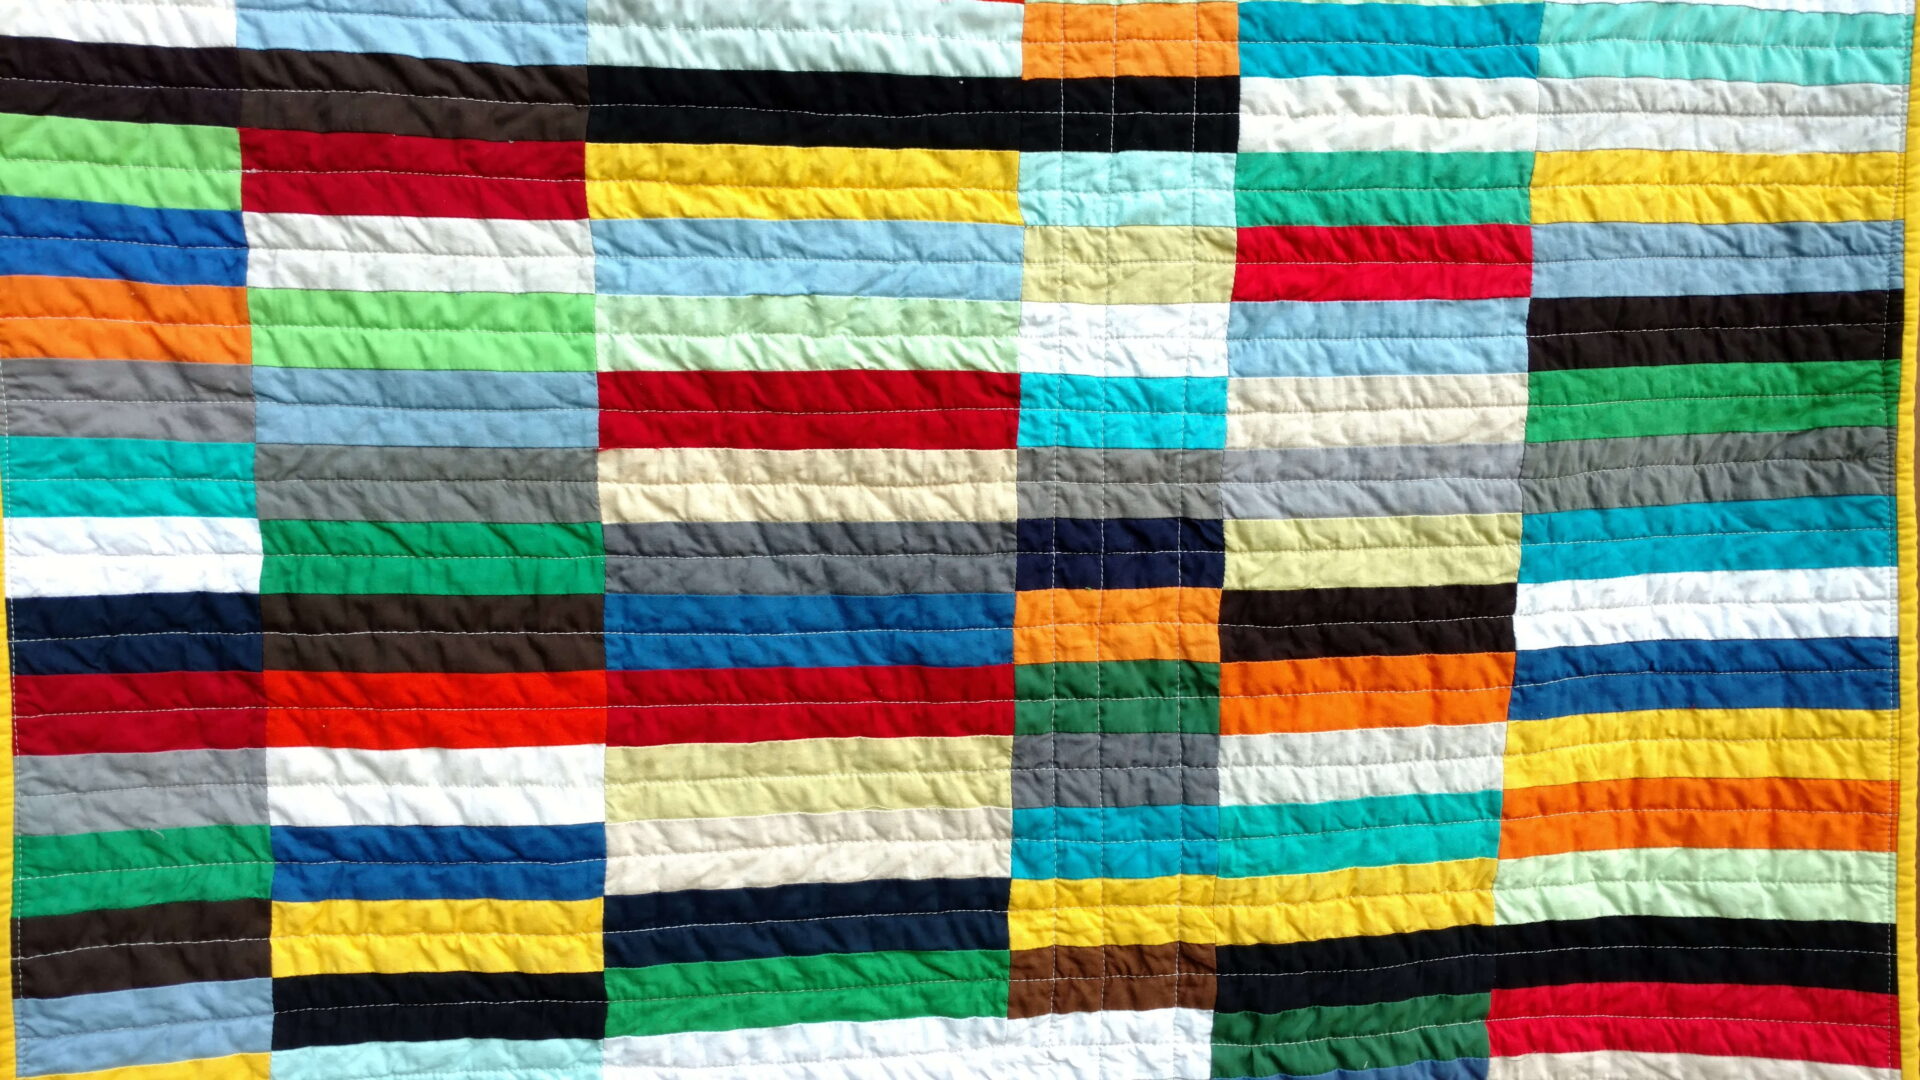
Grab randomly from each pile and begin piecing two strips together of the same size. Rows include 28 strips, or 14 pairs, to make a baby quilt size. Piece all 5 inch strips first. Starch and press the seams all going one direction. Next the 7 inch strips. Starch and press the seams all going the same direction. Finally, the 9 inch strip set. Sew and press in the same manner. Nestle the seams of the 5 inch row and 7 inch row together, pin if needed. Sew the rows together. The outcome is randomly placed colors without overthinking the process.
My version goes in this order: 5 inch, 7 inch, 9 inch, 5 inch, 7 inch, and 9 inch. If you wanted a little larger baby quilt, you could throw another 5 inch row after the last 9 inch row.
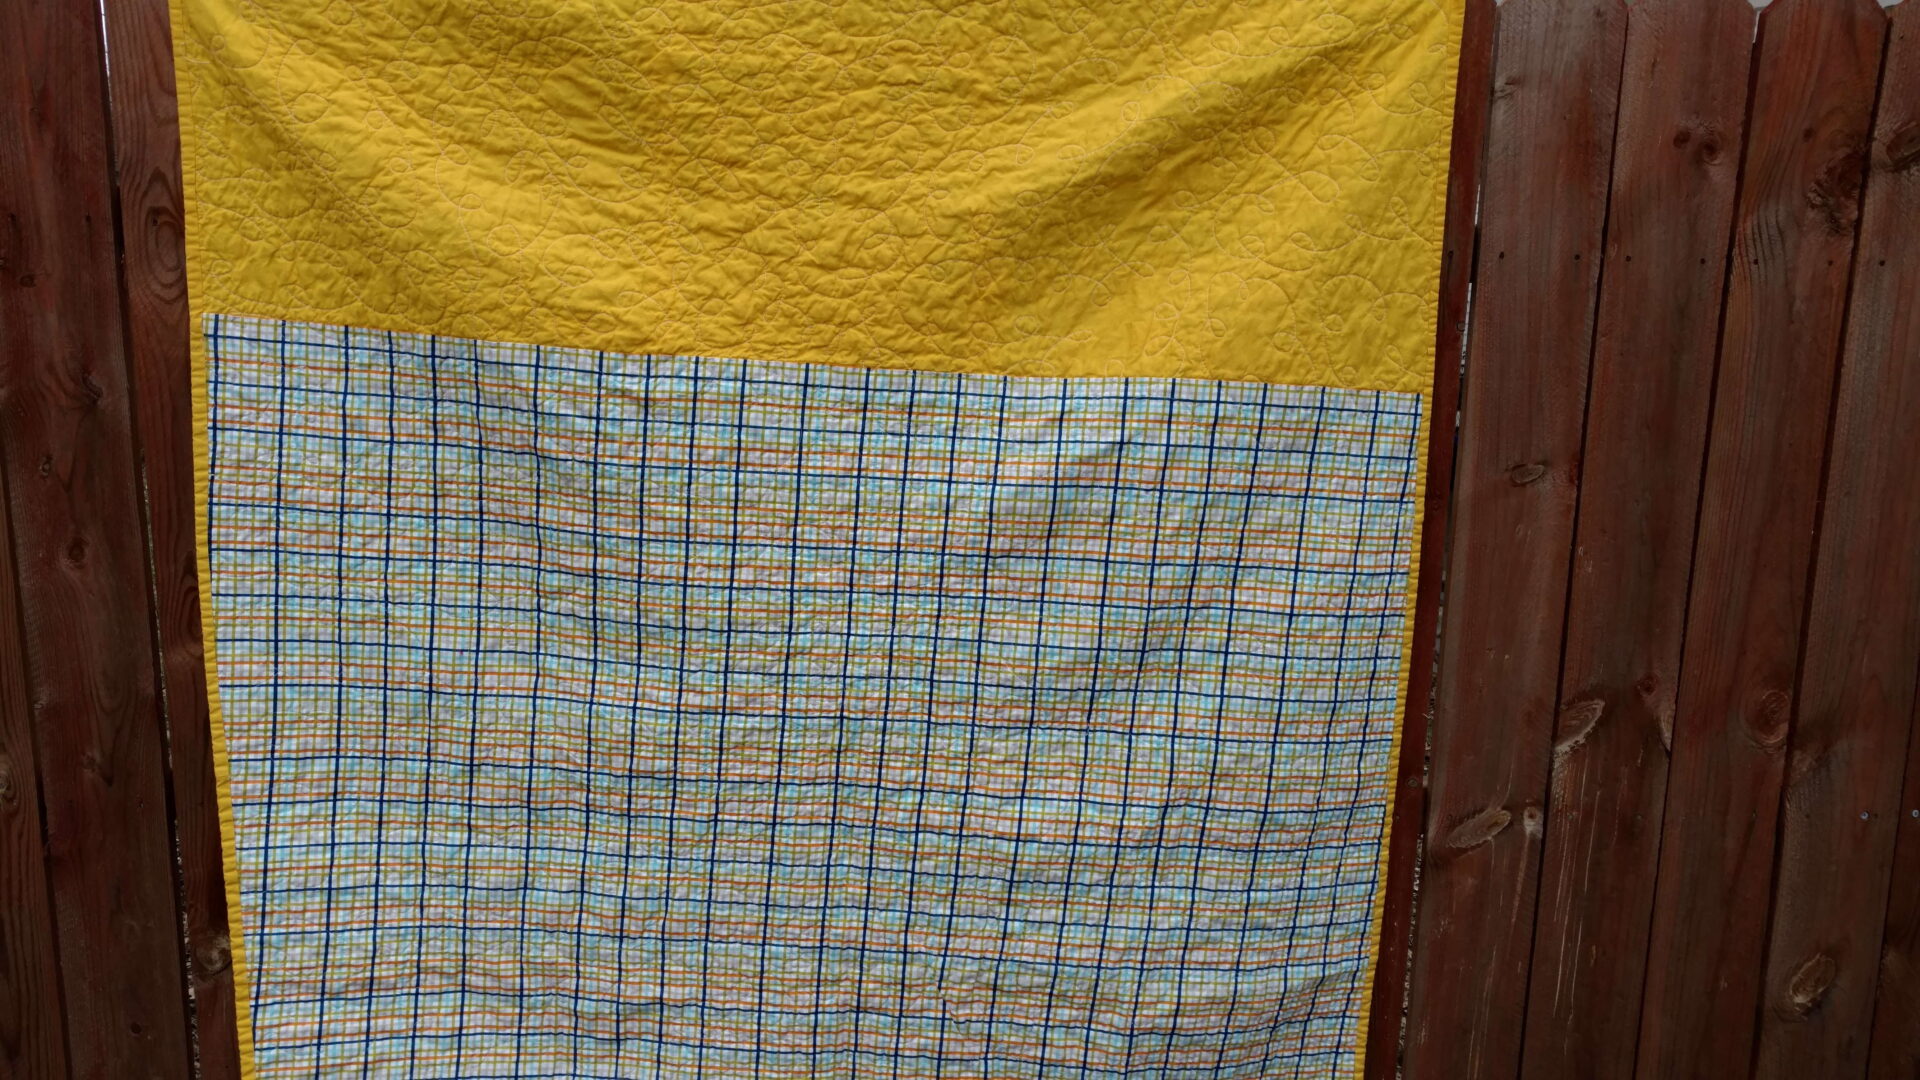
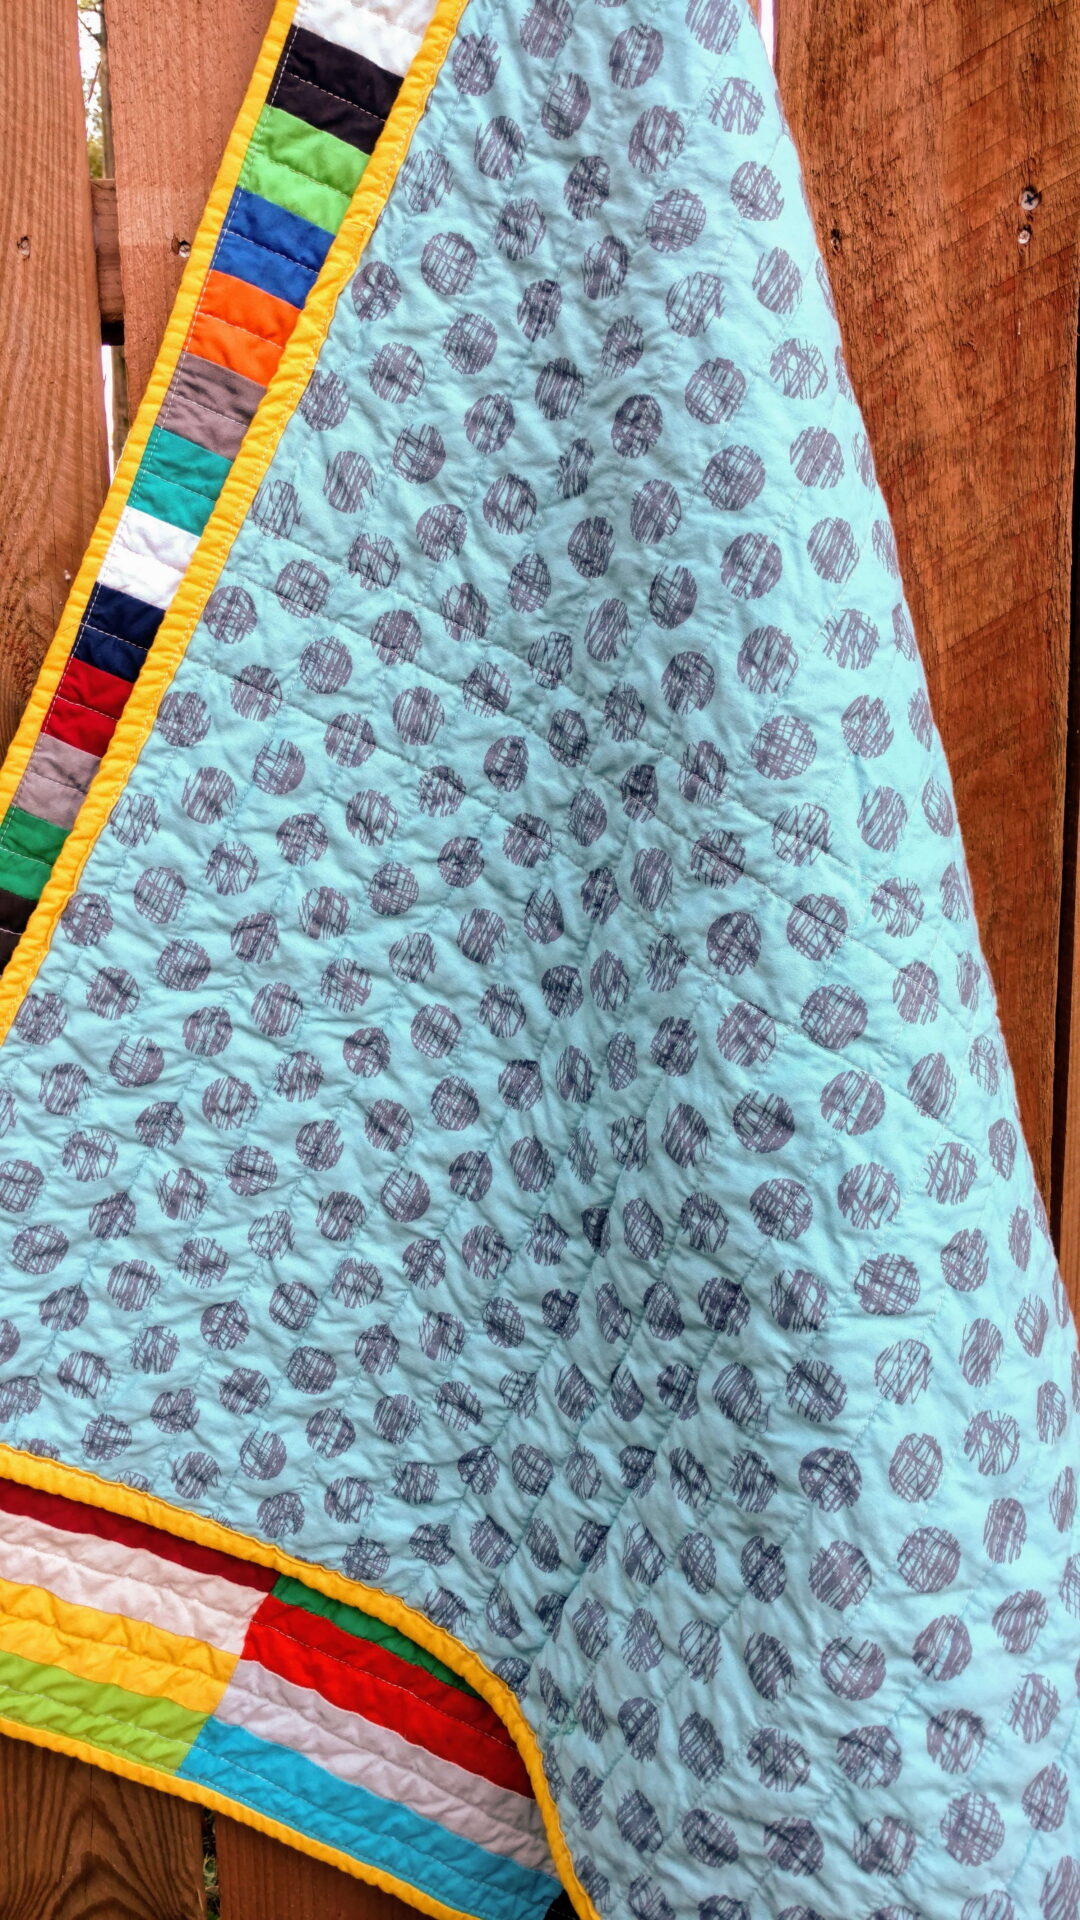
I starched the top and pressed my row seams open. The backing is a blue print I picked up a few months ago when a local quilt shop was closing out their inventory. With this size quilt, I only needed a yard of the fabric.
Quilting and Binding
The quilt is randomly pieced, but I knew for the quilting exactly what I wanted. Straight lines in a light gray horizontally in the middle of each row. A few lines in the middle 5 inch strip vertically. In your version quilt as desired.
The secondary shapes created with colors being close together was an unintended effect. They could have been moved, but then the random process is lost. That was more important to me as I just wanted to create.
Finally, I grabbed Corn Yellow Kona Solid I have had forever to create the binding. The binding was 2.5 inch double fold and completely machine bound.
Final Thoughts
Love all the crinkles in this quilt after it was washed. Wonder what the rows would look like in an ombre?
This quilt is currently on the way to a new home. Check out my other quilts using just solids below. The solids scrap bin is still too full.
As my weeks have become more hectic, there are a few things that have helped through the chaos. These are my favorite things this week.
Target
Who doesn’t love Target already? There is one close to house I like to sneak off to and enjoy browsing items for inspiration. They have a School List Assist feature on their Web site that I used this week. P is starting Pre-K MONDAY! His school has a generic supply list and Target had it on their site. I was able to just grab the list and load into my cart, presto! There are a couple of little items left to pick up, but I’m done.
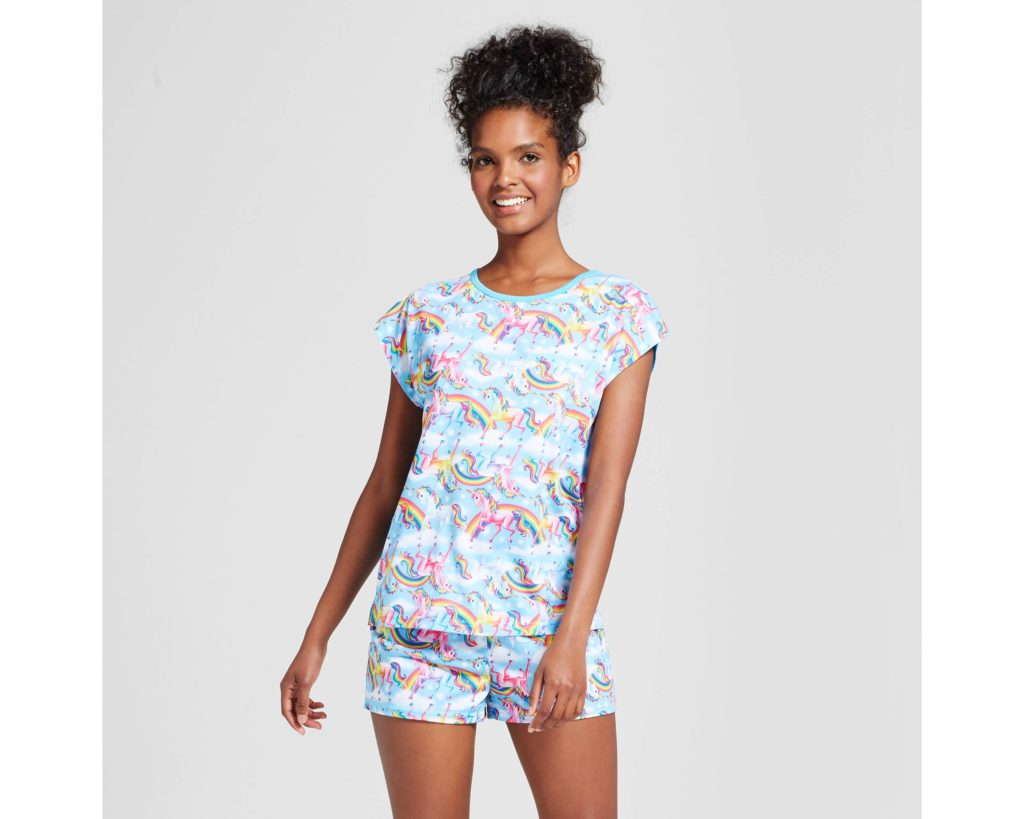
Did you also see that Target is now offering Lisa Frank pajamas for grown ups? Just take my money. I could totally wear this set and snuggle under my Scrappy Unicorn Rainbow Sprinkles quilt. Rad!
via Target.com
Health & Fitness
As my mileage has gone up with training, I’m reading a bit more health and fitness related articles. The topics mostly include making time and motivation. Talking about making time for exercise is not an easy conversation to have personally. I am giving up time away from other things I enjoy to help reach this goal. I’m investing in myself to make this happen. Transformation Fitness & Wellness had an article on making time this week that hit home. Read it and tell me your thoughts.
The health coach in me has to agree there is no on or off track, you are just living. Many people feel one bad thing in the day ruins the whole day and that’s not the case, especially when it comes to diet and exercise. This quote from the article because I have heard this from many people in coaching.
I was putting so much pressure on myself to be perfectly “healthy” that any slip-up, no matter how small, was seen as failure and I’d consider the whole day a loss, binging on junk food and telling myself I’d just start again fresh the next day. I was either 110% on track or 110% off the rails. ~ Pumps & Iron
We have to treat ourselves better than that. If that is your mentality, let’s chat about some ways to build your skills in that area. Check out the post here. What was your take away?
Sewing & Quilting
Quarter square log cabins are quite trendy right now. They look like great scrap busters. Have you made one? Below are links to a couple of finished quilts posted this week.
For myself I plan to start on P’s Halloween quilt. My beemates made gorgeous Halloween themed blocks and I just need to make a few more to complete the top. If time allows over the weekend, maybe even a tutorial on my improv scrappy blocks from the quilt above.